If you want to surf easily through the internet, you have installed an AdBlocker for sure! If not, this is a free tip 🙂 You can install an AdBlocker as an add-on in your browser. But unfortunately advertisement on webpages is not the only advertisement we are seeing. No, we see it in YouTube, Google, Facebook, in our Apps on our phones and even sometimes on our tv’s. The crazy thing is that my kids are installing a lot of free games on their phones and are getting a lot of advertisements. Sometimes not even for kids… Next to that I want to block some website, in case they are mistakenly going to wrong places. Luckily there is a solution for that and it is FREE!! It is called Pi-Hole which is a DNS advertisement blocker and in this blog I am going to explain how I installed it on my network.
In my Proxmox environment I created a new container with Ubuntu 16.04. I configure 4GB of storage, 1 CPU, 1GB Memory and I configure a static IP address. This must be a static IP address because it is going to be the future DNS of all my devices.
After creating the Ubuntu container, login via SSH # ssh root@ipaddress
NOTE: if you cannot login via SSH because of error “Permission denied, please try again.”, then go to the CLI on the Proxmox server and edit the file /etc/ssh/sshd_config # nano /etc/ssh/sshd_config Change option “PermitRootLogin” to “yes” Restart SSH service # systemctl restart ssh
Setup your timezone # sudo dpkg-reconfigure tzdata In my case, I choose Europe – Amsterdam # sudo apt install ntp -y # service ntp status # date Check if the date/time is correct
Install Pi-Hole # apt install curl # curl -sSL https://install.pi-hole.net | bash Follow the installation wizard, I only mention the one’s which I change Select Upstream DNS Provider – Google
After the installation is completed, you receive an overview of the settings and password. You can go to the Pi-Hole website # https://ipaddress/admin
Change password to something you can remember 🙂 # sudo pihole -a -p
Last step is to add this IP address as your primaire DNS in your router.
Have fun on the internet without crazy advertisements 🙂
Update: If you don’t see any activity after some time, update your grafity. Go to your Dashboard Login Tools Update Grafity Update
Okay, there are many ways to make your home smart. But what is the best way? What is the most secured way? Great questions. For now I do not have the answer for that. I already had a led dimmer from EcoDim (https://www.ecodim.nl/eco-dim07-zigbee-pro.html). This one supported the Zigbee protocol, so I am going to use that. This is also be used by the Philips Hue and Ikea Hub. Of course I am a IT guy, so I am not going to buy a gateway/hub, but I am going to build one 🙂
For this build, I am using a Raspberry Pi 3 with a ConBee II (Zigbee USB-Gateway) and I am going to install Domoticz (https://www.domoticz.com/) on it.
First step is to go to the ConBee website and download the installation image. They already have start ready images for you. I choose the Raspbian Buster Headless (Beta image without desktop based on Debian Buster). To write this image to the SD card, you need to download the Etcher program. Install and start it.
1. Insert the SD-card into a SD card reader 2. Press Select image and select the downloaded SD-card image (Phoscon_Gateway_Headless_2020-10-16.xz) 3. Press Select drive and select the SD card drive 4. Press Flash! to start the copy process
Place the SD card into the Raspberry Pi, add network and add the USB ConBee 2. Add power to boot. SSH is by default enabled. Find the IP of the Raspberry Pi by checking your DHCP list on your router or by adding a monitor to it and run # ip a
Login credentials are: Username: pi Password: raspbeegw
Change basic configurations by running command with root permissions: # sudo raspi-config
Change the following settings (feel free to change more): 1. Change User Password 2. Network Options – Hostname 4. Localisation Options – Time Zone 7. Advanced Options – Expand Filesystem 8 Update Some of the settings need a reboot to get activated, run command # sudo reboot
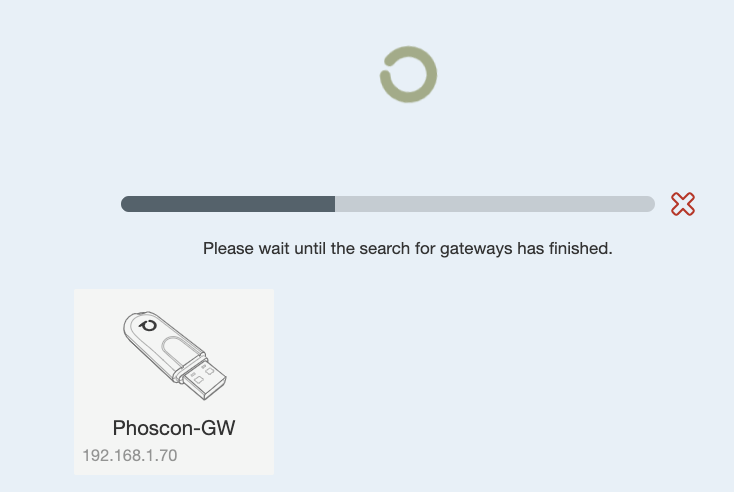
On the Pi or on a different computer in the same network, go to http://phoscon.de/app Click on the icon in the top (some kind of “P”) to start the search to your Phoscon gateway. When it is found, it will be displayed below the search bar. See printscreen below.
When the gateway is found (in my case the Phoscon-GW), click on it. Set a Gateway name and a Login password and click on Next.
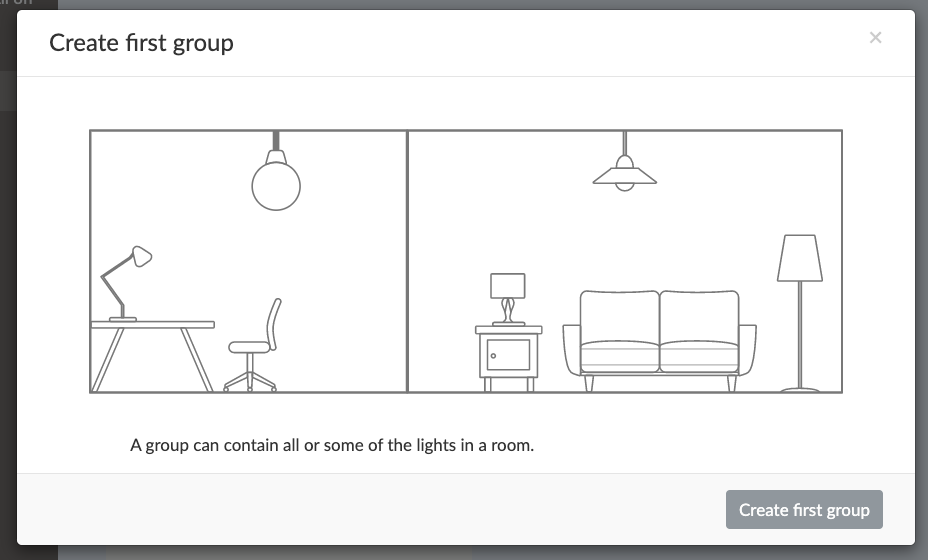
In the next step you can connect lights, but I don’t have installed one yet, so I will continue with the button in the top right Proceed without lights ->
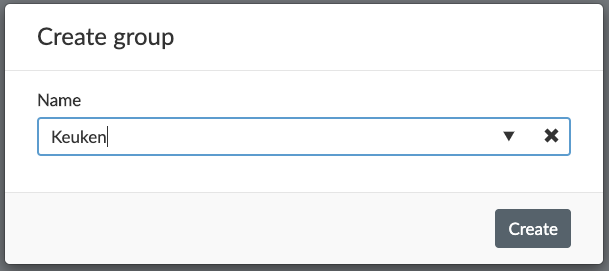
In the next step you can create your first group by clicking on Create first group, give it a name (in my case Keuken) and click on Create
Go back to Raspberry Pi (via SSH) to download and install Domoticz. Run command:
Now we are going to install Domoticz. Start the installation by running command # curl -L https://install.domoticz.com | bash This installation will start a wizard.
Select Services: Both HTTP and HTTPS HTTP Port number: 8080 HTTPS Port number: 443 Installation folder: /home/pi/domoticz After the installation is complete, you can find the installation log in /etc/domoticz
During my plugin installation (explained later), I had some issues finding it. Seems that we also need to install some python libraries. Run command # apt-get install python3 libpython3-dev libpython3.4-dev After install, restart Domoticz # sudo service domoticz restart
Now we are installing the deCONZ plugin to Domoticz. Go to the plugin folder # cd /home/pi/domoticz/plugins Download the plugin # git clone https://github.com/Smanar/Domoticz-deCONZ.git Be sure the plugin has the right permissions # chmod +x Domoticz-deCONZ/plugin.py
Connection between Domoticz and DeCONZ is going via API. So, first we need to generate a key. First go into the plugin folder # cd Domoticz-deCONZ Generate the key # python3 API_KEY.py 127.0.0.1 create The response will be something like this: Your new API key is : 688C0296EC
Now we are going to add this key to Domoticz, but first we need to restart Domoticz # sudo service domoticz restart
After the restart (10 seconds), visit your Domoticz website. http://ip_of_pi:8080 or https://ip_of_pi:443
In Domoticz, go to Setup – Settings
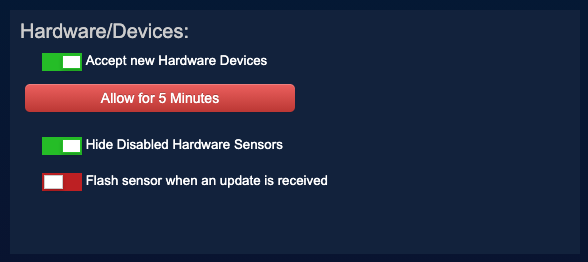
Go to Hardware/Devices (at the bottom of the page) and be sure Accept new Hardware Devices is ON (green)
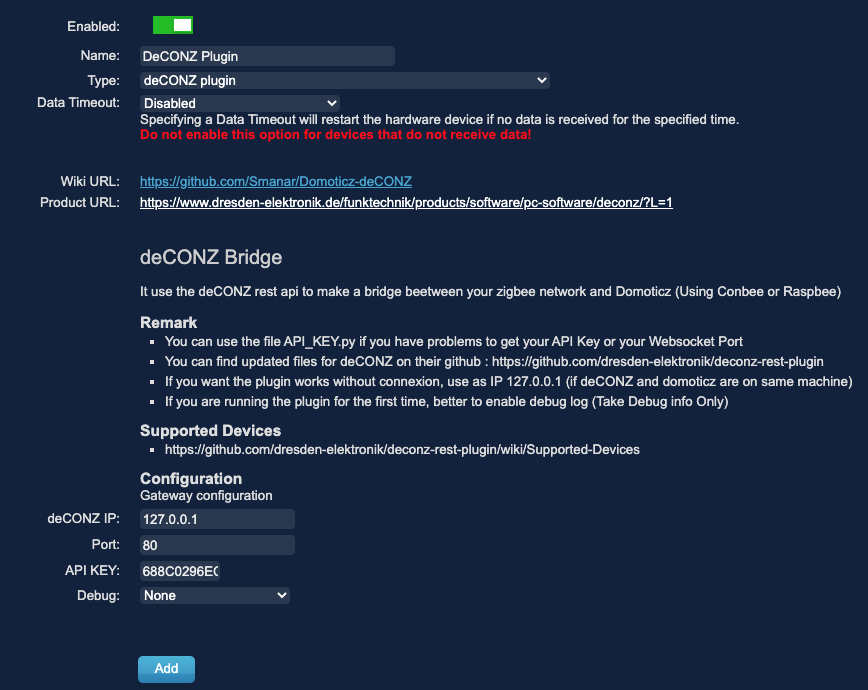
Go to Setup – Hardware Add the DeConz Plugin Add a Name and change the API KEY to the key you just generate.
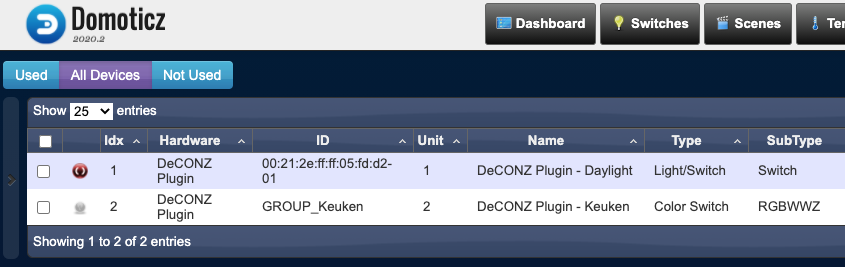
After clicking on Add, you can see in the top the just created Device
All devices which are already created are added to Domoticz!
You are now ready to add more devices to Domoticz and to personalise it special for yourself 🙂
RedHat OpenShift is the new platform to be! If you want to be ready for the future, you have to be on Red Hat OpenShift Container Platform. But how can you play with OpenShift? First thing I find on the web is Minishift or OKD. But both are only updated to (OpenShift) 3.11 and at the time of writing, OpenShift 4.6 is released. And of course we want to play with the latest versions 🙂 Luckily Red Hat has given us more options.
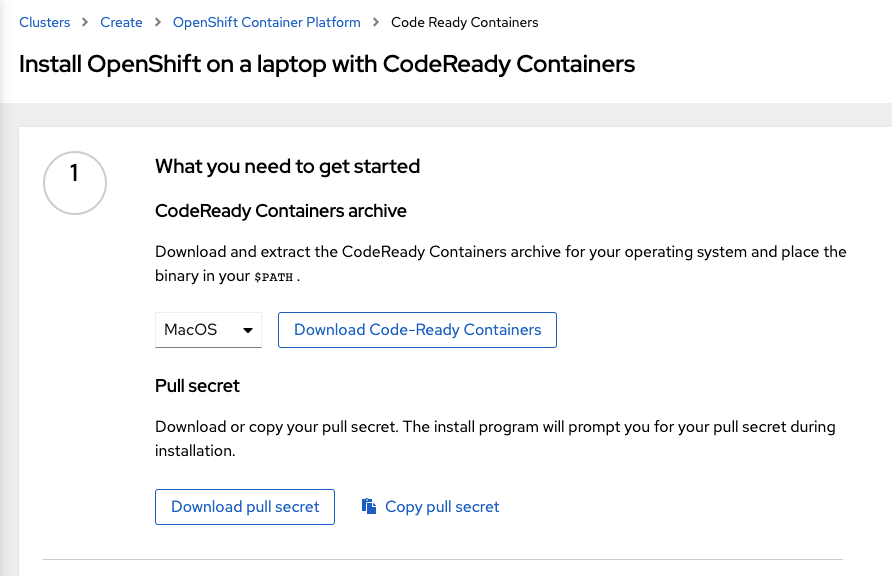
To try RedHat OpenShift, you can go to openshift.com/try. Here you find 4 options. 1. On your computer 2. In your datacenter 3. In your public cloud 4. As-a-Service
The beste choice for me is 1 because a full installation of OpenShift requires a lot of resources which I do not have. I just want a minimal installation to test and play.
When you choose for On your computer, you have to login with your Red Hat account. If you don’t have one, you can create it directly. On the Red Hat website you can download CodeReady Containers (CRC), which can bring a minimal OpenShift cluster up and running on your local laptop or pc. CRC OpenShift cluster is a single node which behaves as both a master and worker node. All machine-config and monitoring Operators are disabled. That why it is to play and test only.
How to install? The hardware requirements for CRC are – 4 vCPUs – 9GB Memory – 35GB Harddisk As OS, you can choose for minimum Windows 10, MacOS Sierra or Linux RHEL\CentOS 7.5 or Fedora (last 2 versions). In my case, I install it on my virtual server (running on Proxmox) where I choose CentOS 8.2. I installed CentOS with 4 vCPUs, 10GB Memory and 50GB of Harddisk (bye bye resources).
After CentOS is installed, you also need to install the Network Manager: # su -c 'yum install NetworkManager' In my case, this was already installed during the basic setup.
Next is to download and install CRC. The link can be found on the RedHat website. Choose Linux and check the link. Download the files to the Linux server. Please notice that the file is about 2.5GB big. Depending on your internet speed, this can take a while. # wget https://mirror.openshift.com/pub/openshift-v4/clients/crc/latest/crc-linux-amd64.tar.xz
Unpack the downloaded file: # tar -xf crc-linux-amd64.tar.xz
Move the CRC file to a path directory or add the directory to the path file. I choose for the move. Check your path directories by running command # echo $PATH
I move the file to /usr/local/bin # sudo cp crc /usr/local/bin/
Check if the installation was successful by checking the installed version # crc version CodeReady Containers version: 1.17.0+99f5c87 OpenShift version: 4.5.14 (embedded in binary)
Start the setup of CRC This procedure will create the ~/.crc directory if it does not already exist. # crc setup INFO Checking if oc binary is cached INFO Caching oc binary INFO Checking if podman remote binary is cached INFO Checking if goodhosts binary is cached INFO Caching goodhosts binary INFO Will use root access: change ownership of /home/bjbaarssen/.crc/bin/goodhosts INFO Will use root access: set suid for /home/bjbaarssen/.crc/bin/goodhosts INFO Checking if CRC bundle is cached in ‘$HOME/.crc’ INFO Unpacking bundle from the CRC binary INFO Checking minimum RAM requirements INFO Checking if running as non-root INFO Checking if Virtualization is enabled INFO Setting up virtualization You need to enable virtualization in BIOS
By default, the settings in Proxmox for nested virtualization are disabled. Normally you are not virtualizing within your virtualization layer because it is much slower. At this point, I have not other solution, so I have to change my Proxmox settings.
Change Proxmox settings: Source: https://pve.proxmox.com/wiki/Nested_Virtualization Login into your Proxmox shell. Check your virtualization settings: # cat /sys/module/kvm_intel/parameters/nested output is N
Change the virtualization settings to Y # echo “options kvm-intel nested=Y” > /etc/modprobe.d/kvm-intel.conf
This setting will be activated after your restart of the service. Because lots of other virtual servers are running on Proxmox, I have to shutdown all my servers. The service can not be restarted when it is in use.
After you shutdown all the servers, restart the service: # modprobe -r kvm_intel # modprobe kvm_intel
Check if the new setting is active: # cat /sys/module/kvm_intel/parameters/nested output is Y
Also for the CentOS, the hosts settings in Proxmox need to be changed. Go to the CentOS settings, Hardware – Processors (or CPU) and change to TYPE to HOST. See printscreen:
Start VM(s)
Start the setup of CRC (second try) # crc setup INFO Checking if oc binary is cached INFO Checking if podman remote binary is cached INFO Checking if goodhosts binary is cached INFO Checking if CRC bundle is cached in ‘$HOME/.crc’ INFO Checking minimum RAM requirements INFO Checking if running as non-root INFO Checking if Virtualization is enabled INFO Checking if KVM is enabled INFO Checking if libvirt is installed INFO Installing libvirt service and dependencies INFO Will use root access: install virtualization related packages [sudo] wachtwoord voor bjbaarssen: INFO Checking if user is part of libvirt group INFO Adding user to libvirt group INFO Will use root access: add user to libvirt group INFO Checking if libvirt daemon is running INFO Checking if a supported libvirt version is installed INFO Checking if crc-driver-libvirt is installed INFO Installing crc-driver-libvirt INFO Checking for obsolete crc-driver-libvirt INFO Checking if libvirt ‘crc’ network is available INFO Setting up libvirt ‘crc’ network INFO Checking if libvirt ‘crc’ network is active INFO Starting libvirt ‘crc’ network INFO Checking if NetworkManager is installed INFO Checking if NetworkManager service is running INFO Checking if /etc/NetworkManager/conf.d/crc-nm-dnsmasq.conf exists INFO Writing Network Manager config for crc INFO Will use root access: write NetworkManager config in /etc/NetworkManager/conf.d/crc-nm-dnsmasq.conf INFO Will use root access: Changing permission for /etc/NetworkManager/conf.d/crc-nm-dnsmasq.conf to 420 INFO Will use root access: executing systemctl daemon-reload command INFO Will use root access: executing systemctl reload NetworkManager INFO Checking if /etc/NetworkManager/dnsmasq.d/crc.conf exists INFO Writing dnsmasq config for crc INFO Will use root access: write dnsmasq configuration in /etc/NetworkManager/dnsmasq.d/crc.conf INFO Will use root access: Changing permission for /etc/NetworkManager/dnsmasq.d/crc.conf to 420 INFO Will use root access: executing systemctl daemon-reload command INFO Will use root access: executing systemctl reload NetworkManager Setup is complete, you can now run ‘crc start’ to start the OpenShift cluster
Start the OpenShift cluster # crc start INFO Checking if oc binary is cached INFO Checking if podman remote binary is cached INFO Checking if goodhosts binary is cached INFO Checking minimum RAM requirements INFO Checking if running as non-root INFO Checking if Virtualization is enabled INFO Checking if KVM is enabled INFO Checking if libvirt is installed INFO Checking if user is part of libvirt group INFO Checking if libvirt daemon is running INFO Checking if a supported libvirt version is installed INFO Checking if crc-driver-libvirt is installed INFO Checking if libvirt ‘crc’ network is available INFO Checking if libvirt ‘crc’ network is active INFO Checking if NetworkManager is installed INFO Checking if NetworkManager service is running INFO Checking if /etc/NetworkManager/conf.d/crc-nm-dnsmasq.conf exists INFO Checking if /etc/NetworkManager/dnsmasq.d/crc.conf exists ? Image pull secret [? for help]
Copy the pull secret from your Red Hat account (see printscreen) and paste on the CLI and press Enter
INFO Extracting bundle: crc_libvirt_4.5.14.crcbundle … crc.qcow2: 9.97 GiB [—] 100.00% INFO Checking size of the disk image /home/bjbaarssen/.crc/cache/crc_libvirt_4.5.14/… INFO Creating CodeReady Containers VM for OpenShift 4.5.14… INFO CodeReady Containers VM is running INFO Generating new SSH Key pair … INFO Copying kubeconfig file to instance dir … INFO Starting network time synchronization in CodeReady Containers VM INFO Verifying validity of the cluster certificates … INFO Check internal and public DNS query … INFO Check DNS query from host … INFO Starting OpenShift kubelet service INFO Configuring cluster for first start INFO Adding user’s pull secret … INFO Updating cluster ID … INFO Starting OpenShift cluster INFO Updating kubeconfig WARN The cluster might report a degraded or error state. This is expected since several operators have been disabled to lower the resource usage. For more information, please consult the documentation Started the OpenShift cluster. To access the cluster, first set up your environment by following ‘crc oc-env’ instructions.Then you can access it by running ‘oc login -u developer -p developer https://api.crc.testing:6443’. To login as an admin, run ‘oc login -u kubeadmin -p dpDFV-xamBW-kKAk3-Fi6Lg https://api.crc.testing:6443’.*** To access the cluster, first set up your environment by following ‘crc oc-env’ instructions.
Check the status of your CRC Cluster # crc status CRC VM: Running OpenShift: Running (v4.5.14) Disk Usage: 13.8GB of 32.72GB (Inside the CRC VM) Cache Usage: 13.04GB Cache Directory: /home/bjbaarssen/.crc/cache
To open the OpenShift webconsole, run the command # crc console This will open your default webbrowser and start the OpenShift Web Console. If something is going wrong, you get this error: Opening the OpenShift Web Console in the default browser…[bjbaarssen@192 ~]$ Error: no DISPLAY environment variable specified
You can also request the URL also by # crc console --url https://console-openshift-console.apps-crc.testing
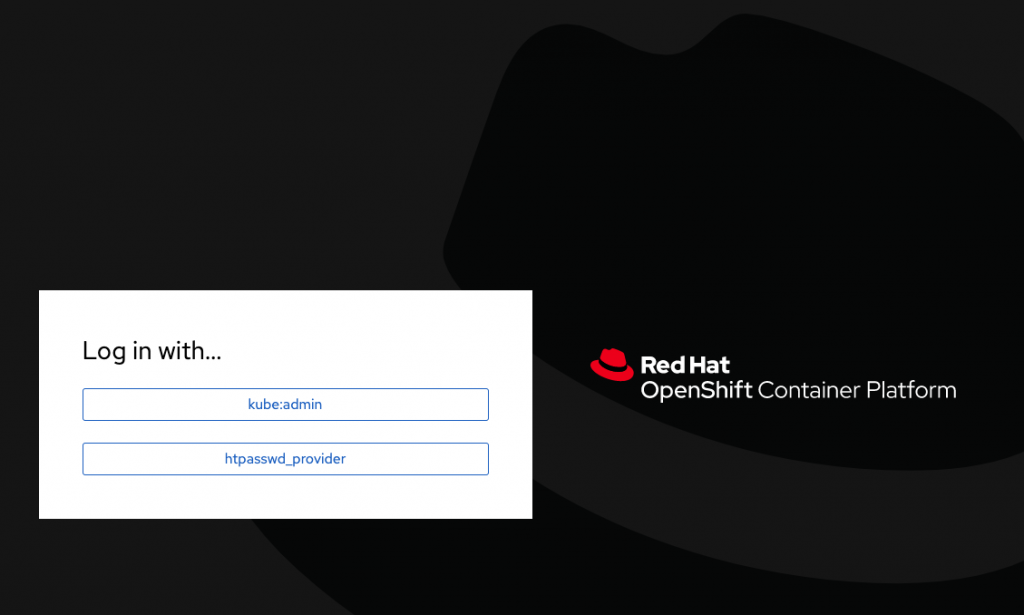
If you forgot the login credentials, you can run # crc console --credentials To login as a regular user, run ‘oc login -u developer -p developer https://api.crc.testing:6443’. To login as an admin, run ‘oc login -u kubeadmin -p dpDFV-xamBW-kKAk3-Fi6Lg https://api.crc.testing:6443’
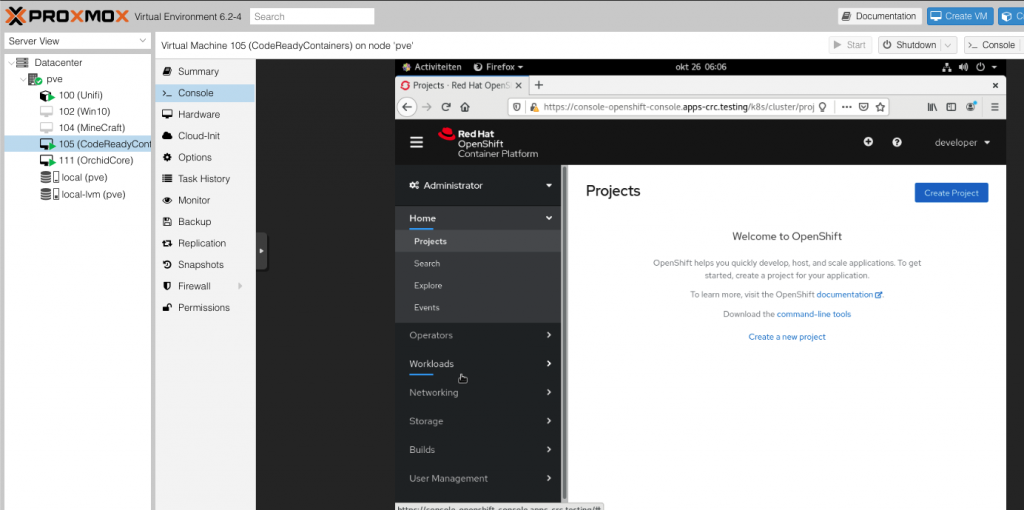
When you successfully run the command and logged into the Web Console, you can start with your first project. See printscreen.
From this point we can open the OpenShift Web Console only on the Virtual Linux machine, but I want to open it on all my machines in my network. Let’s see how we can do that.
Setting up CodeReady Containers on a remote server
Be sure the cluster is running, check with # crc status if down/stopped, run # crc start
Install the haproxy package and other utilities # sudo dnf install haproxy policycoreutils-python-utils jq
Modify the firewall to allow communication with the cluster: # sudo systemctl start firewalld # sudo firewall-cmd --add-port=80/tcp --permanent # sudo firewall-cmd --add-port=6443/tcp --permanent # sudo firewall-cmd --add-port=443/tcp --permanent # sudo systemctl restart firewalld
For SELinux, allow listening to TCP port 6443 # sudo semanage port -a -t http_port_t -p tcp 6443
Create a backup of the default haproxy configuration in case you messed it up: # sudo cp /etc/haproxy/haproxy.cfg{,.bak}
Configure haproxy for use with the cluster: # export CRC_IP=$(crc ip) # sudo nano /etc/haproxy/haproxy.cfg Add the following to the cfg file: global debug
defaults log global mode http timeout connect 5000 timeout client 5000 timeout server 5000
frontend api bind 0.0.0.0:6443 option tcplog mode tcp default_backend api
backend api mode tcp balance roundrobin option ssl-hello-chk server webserver1 $CRC_IP:6443 check
Start the haproxy service: # sudo systemctl start haproxy
To open the OpenShift Web Console on your local clients in your network, add the following to their local hosts file. In my case, 192.168.1.64 is the ip address of the server where CRC is running. # sudo nano /etc/hosts Add the following to the hosts file 192.168.1.64 api.crc.testing oauth-openshift.apps-crc.testing console-openshift-console.apps-crc.testing default-route-openshift-image-registry.apps-crc.testing
You probably don’t see any new blog online soon, because I am playing in Red Hat OpenShift Container Platform 🙂
Because this will eat a lot of your resources, you can easily temporally shutdown your CRC cluster and start it when you need it. See below the most common commands. # crc stop # crc status # crc start # crc console
In my previous blog you can read about the server I build. This blog will describe the OS layer I will install on this build. I choose for Proxmox Virtual Environment or in short, Proxmox VE. Proxmox VE is a complete open-source platform for enterprise virtualization. With the built-in web interface you can easily manage VMs and containers, software-defined storage and networking, high-availability clustering, and multiple out-of-the-box tools on a single solution.
I have to say that Proxmox is one of the better website which describe how to install and use their products. When you enter the get-started section of there website, there are 3 steps defined. See the full installation guide for more information.
Step 1: Download ISO image An ISO image file is an image of a disk. Download the Proxmox VE ISO, then copy it to a USB flash drive or CD/DVD in order to use it. Copy an ISO to my USB stick is not an everyday taks for me, so I used the steps from the full installation guide which was very detailed. Below I describe how you can do it on a MacOS, but Linux and Windows are also available. More info here. I downloaded version 6.2-1 when I write this blog.
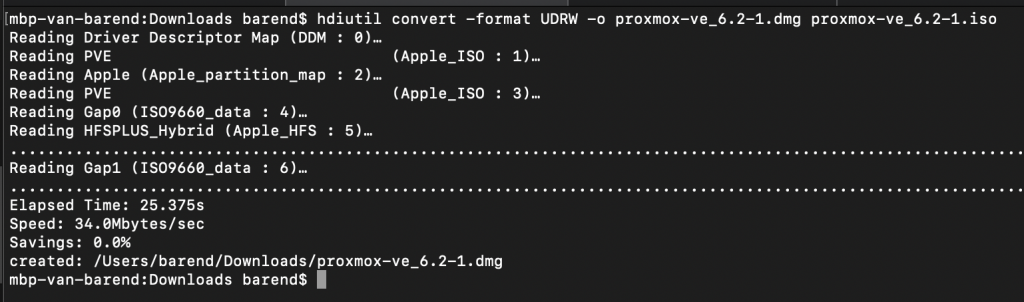
First we need to convert the .iso file to .img using the convert option of hdiutil. Go to the directory where you downloaded the ISO and run this command: # hdiutil convert -format UDRW -o proxmox-ve_6.2-1.dmg proxmox-ve_6.2-1.iso
The new dmg file is about 900MB, but is probably compressed and will be uncompressed when we write it to the USB drive. My advise is to use an USB drive which is bigger than 1GB.
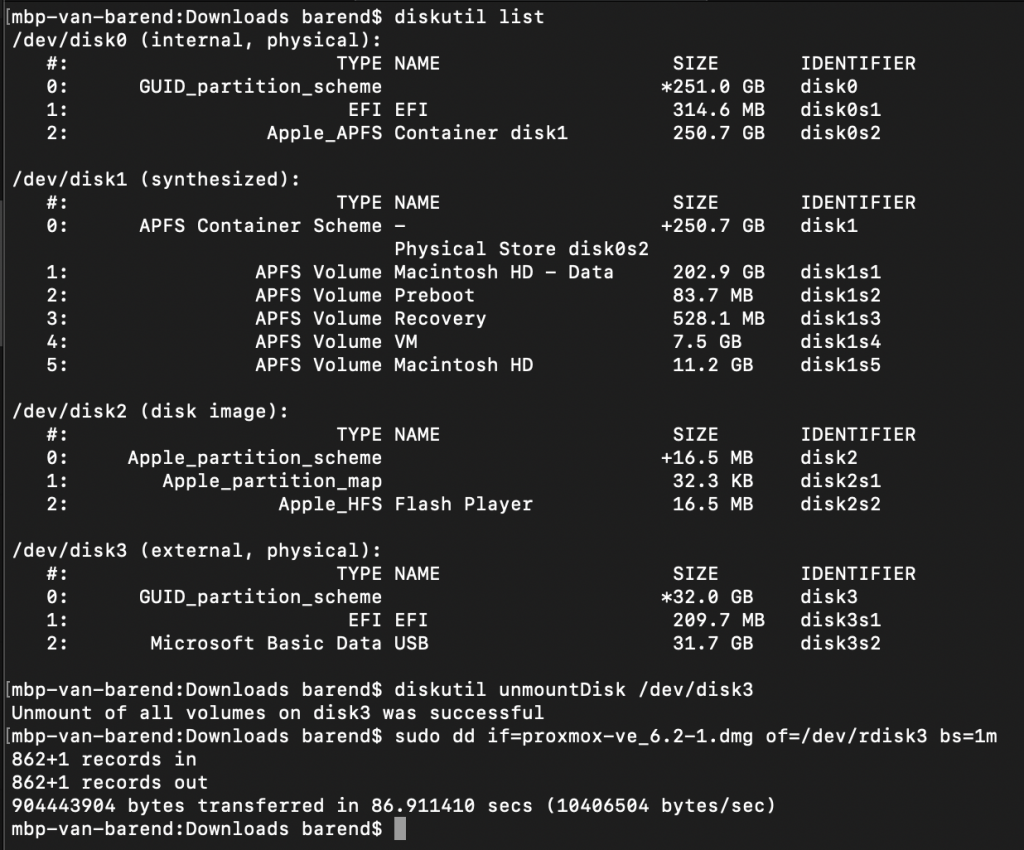
To get the current list of devices run the command (see printscreen below) # diskutil list
Write down the USB drive, in my case it is /dev/disk3 The USB needs to be unmounted before you can write an image to it. Unmount the disk with command # diskutil unmountDisk /dev/disk3
Write the image to the USB with command # sudo dd if=proxmox-ve_6.2-1.dmg of=/dev/rdisk3 bs=1m * We use rdiskX instead of diskX because it will increase the write speed. When this is finished, the USB is ready to use. See below the output from the 3 commands
Step 2: Boot from USB Connect the USB drive to the server and make sure that booting from USB is enabled (check your servers BIOS settings). In my case I have to press F11 after I power on my server. Then follow the steps in the installation wizard. Full description can be found here.
Proxmox VE is based on Debian. This is why the install disk image include a complete Debian system (Debian 10 Buster for Proxmox VE version 6.x) as well as all necessary Proxmox VE packages.
When you booted successful from the USB drive, you get a welcome screen. Choose Install Proxmox VE
Boot image starts and End User License Agreement (EULA) is displayed. Click on I agree
Choose your target harddisk, I choose my SSD /dev/sda (465GB) There is also a button Options where you can change your Filesystem and HDD size. At this moment I leave everything to default. Click on Next
At Location and Time Zone selection, I choose for Country: Netherlands The Time zone: Europe/Amsterdam is automatically adjusted. Choose your Keyboard Layout: U.S. English Click on Next
Create your Administration Password and E-Mail Address and click on Next. This password will be connected to the root user.
Choose your Management Interface. I have only 1 network port, so I have only 1 option. Choose your hostname, IP Address, Netmast, Gateway and DNS Server. There is no automatically (or DHCP) option available. If you are already connected to the network and you have a DHCP configured, everything is already pre-filled for you with a DHCP address. Adjust what you want and click on Next
On the next page you see a summary of your settings you just filled in. Click on Previous if you want to change anything or Click on Install to start the installation process.
When the installation process is finished, you received a message Installation Successful! Click on Reboot and remove the USB Stick you used for the installation.
On another computer/laptop, go to https://Proxmox_IP_address:8006 If you forget https:// there is a possibility that you receive an error.
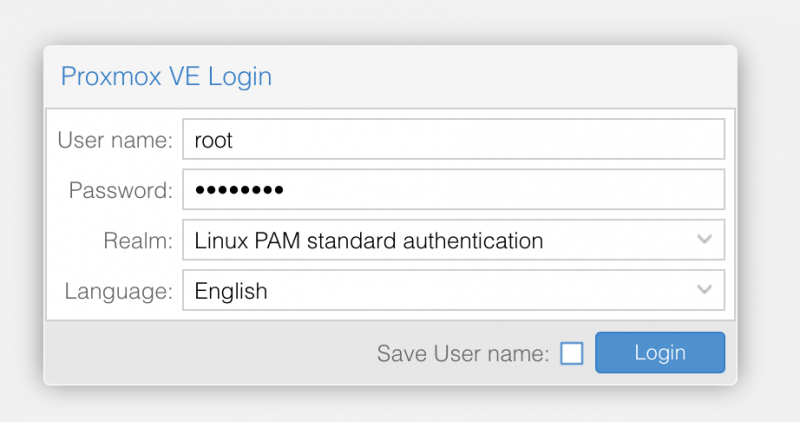
Step 3: Configure via the GUI You can do everything from the website interfase. Just go to the website and login with root and the password you created during the installation process.
Please notice, you receive a No valid subscription because you use the free version without support. If you want support on your server, please go to this address.
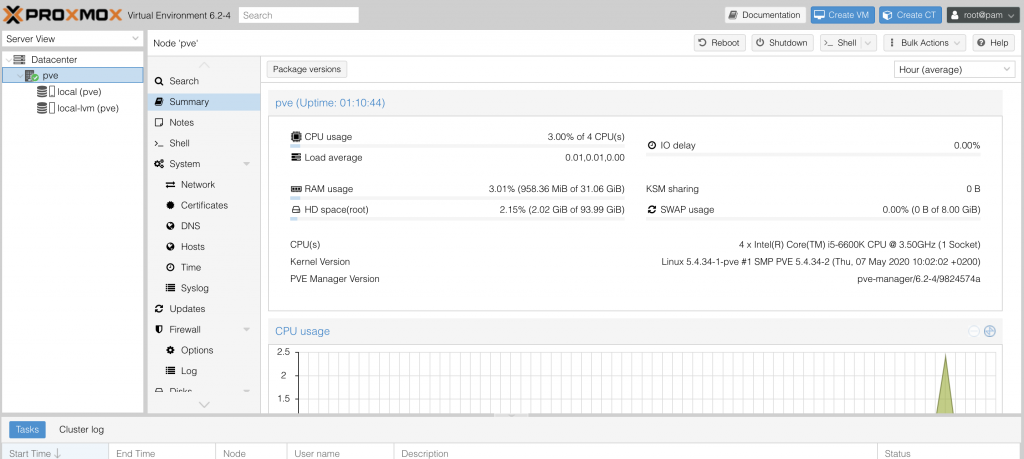
After you clicked on OK, you can access your Proxmox Virtual Environment.
It is very easy to create a VM or CT from this point. I will write a blog about that later.